Accurate Method To Print A Photo Using White Ink Only On Black T-Shirts
We also have a video posted to the site which covers the process discussed below.
Although I’m usually asked complex questions on Photoshop and t-shirt color separations, I’m often asked what’s the best way to take a color or black & white photograph and print it to a black shirt using white ink only.
Most printers will take a color photograph, convert to grayscale or desaturate the image. Then proceed to invert the Layer and print that to film. The only problem with this technique is you’re not getting the full effect of how the image itself will print along with holding far too much grayscale information resulting in poor contrast.
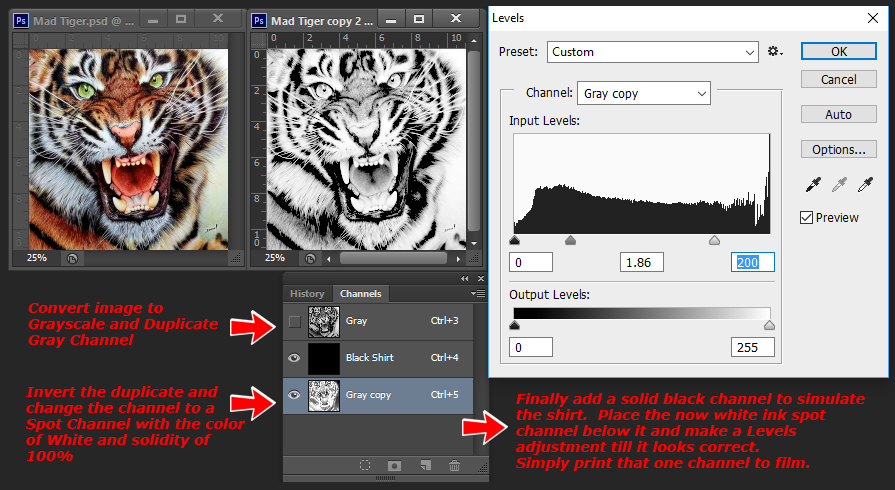
The best method is the one described at the bottom of the page in the commented screenshot although we’ll discuss it here a bit further.
Simply take a single Layer grayscale image or an RGB or CMYK image and convert to grayscale.
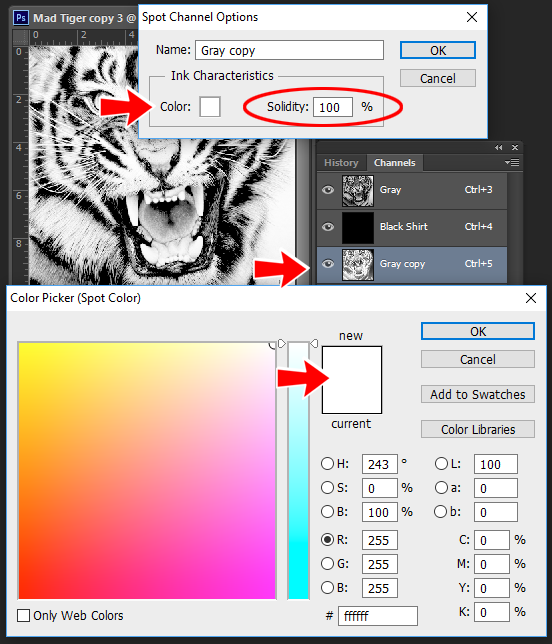
Next in the Channels Panel duplicate the Gray Channel, Invert the new Channel, then convert the inverted duplicate channel to a Spot Channel using the color of White and a solidity setting of 100% as pictured below.

Next make a new spot channel using the color of Black at 100% Solidity (see below), fill the channel with 100% Black and move the channel containing the art below it. This black filled Channel is to simulate the shirt color. If printing on a color other than black, just create the new solid channel using a spot color something close to the shirt color being used and fill with 100% Black.
The channel containing the art will most likely need an adjustment using Levels or Curves to improve the contrast. I normally prefer using Levels to make this adjustment and use the center and far right handles and slide to the left as pictured in the example below.
Following the Levels adjustment, sharpening the channel slightly using the Unsharp Mask function of Photoshop will often improve the art further and add a bit of additional clarity.
The final check would be to define what needs to print absolutely 100% solid white. This is done by using the Curves function to intensify the darkest areas while not bumping up lighter areas.
Another method to intensify the density in the darkest areas to print brighter is while doing the Levels adjustment, move the left slider to the right slightly. This will darken the the art where the most ink is needed.
When making the Curves adjustment (if needed) have the Info Panel of Photoshop open and hover any tool above an area within the art that should be solid. The density reading within the Info Panel should be 100% or close to it. This is far more important with images that contain obvious solids as opposed to a purely photographic image.
Now simply output this single Channel to the printer using whatever settings you’re comfortable with. Another printing method is do a Select All > Copy of the White Ink Channel, create a new grayscale document and Paste into a Layer as opposed to printing the channel. Then just print the single Layer Grayscale document to your printer.
Following the the Select All and Copy, when choosing New Document, Photoshop will automatically be set to create a new document in Grayscale Mode at the exact size and resolution of the image copied to the clipboard. So all that’s needed is to paste into the new file.

