All posts by Steve

Print Photoshop Separations Illustrator Video

Printing Photoshop Multi-Channel Color Separations With Adobe Illustrator

This video covers using Adobe Illustrator to print halftone channel separations done within Adobe Photoshop.
It should be very helpful, especially for newer users just starting out. The video assumes a RIP is being used with your inkjet printer. If a RIP is not available, see our video on printing film positives directly from Photoshop without a RIP.

Unlock UltraSeps How To Video

Unlock UltraSeps v2 On Both Windows And Macintosh Systems

This video covers the unlocking – authorization process of UltraSeps on Windows and Macintosh systems.

We also have a PDF document available that describes the unlock – authorization process in detail HERE.

Ultraseps Install Video Macintosh

Install UltraSeps v2 On Macintosh Systems

This video covers installing UltraSeps on Macintosh systems and illustrates how to check that all elements have been installed properly for UltraSeps v2 to run. For those having difficulty or receiving errors, this video should resolve the issue.

UltraSeps requires an Intel based processor Macintosh. Old Power PC Macs with a G4 or G5 processor are not supported.

If Photoshop is running during the installation, remember to close and restart it prior to using UltraSeps v2.

Ultraseps Install Video Windows

Install UltraSeps v2 On Windows Systems

This video covers installing UltraSeps on Windows systems and illustrates how to check that all elements have been installed properly for UltraSeps v2 to run. For those having difficulty or receiving errors, this video should resolve the issue.

If Photoshop is running during the installation, remember to close and restart it prior to using UltraSeps v2.

Windows 10 Upgrade

Upgrading From Windows 7 – 8 – 8.1 to Windows 10 With UltraSeps

This potential issue has since been resolved several years ago and should no longer occur. If affected however, see below.

UltraSeps may need to be re-authorized to run if updating your system to Windows 10 from an earlier version of Windows not in the Windows 10 family.

The reason is that UltraSeps sees this as a new system and not a system update and will refuse to run. An error will be generated stating “This Application Configured For Use On Only One Computer.”

Instructions:

Close Photoshop.

Download this small file here containing a new Ticket File and unzip.

Open your C: Drive and look for a folder named UltraSeps and open it.

Now open the folder named QuickLicense.

Copy the small unzipped file downloaded named ultraseps2 to the QuickLicense folder.

Launch Photoshop.

Click the Action that says “Unlock UltraSeps Now”.

The Activation Screen with the Request Number will now appear.

Email the Request Number to us and indicate the ultraseps2 ticket has been installed.

If forgetting to tell us you’re using the ultraseps2 ticket file, you will receive an invalid unlock code since we’ll assume its a normal new install.

We’ll then issue a new unlock code within 24 hours or sooner.

Considering this install of UltraSeps might be old, after reauthorizing your system, we highly advise to download and install the licensing updater for Windows here. This will prevent the need for any further authorizations on the installed system if installing a new or different operating system at some later date.

Apply Image Photoshop Tutorial Video

Using Apply Image In Photoshop To Adjust The Underbase White

A basic tutorial on how to use the Apply Image function of Adobe Photoshop to adjust an underbase white channel. Its great for those newer to Photoshop along with users who have little to no experience with the Apply Image function.  Apply Image is a powerful tool offering many variables and is vital within the t-shirt color separation process.

This method is also used to merge any channel, in whole or a percentage of to another channel.
Just substitute a different channel for the white underbase and apply the desired channel to it to merge both.

Change Photoshop To English

Notice To All Non English Photoshop Users

UltraSeps is written in English. The Scripts it runs contain certain Photoshop commands and channel names that are recognizable to the English Language only. If running a French, German, Spanish, etc copy of Photoshop, you may experience difficulty using our product as errors will be generated.

Therefore, if you’d like to use UltraSeps, an English Copy of Photoshop will need
to be installed on your system or your copy can easily be converted to English.

The good news is that its easy to convert a non-English copy of Photoshop to English.
Plus this can easily be changed back to the original language at any time if needed.

Simple Instructions – Convert Non-English Photoshop To English:

First close Photoshop if running.

Using Windows, open the Program Files Folder or if on Mac open the Applications Folder.

On Windows open the Adobe Folder and then open the folder containing your copy of Photoshop in use.

On Mac, there is no Adobe Folder, so look for the folder containing your copy of Photoshop in use and open it.

Next look for a folder named Locales and open it.

You’ll then see a folder with a title something like en_MX, fr_FR, de_DE, etc.
This all depends on what language is installed. Open this folder.

Inside the folder opened discussed above, open the Support Files folder.

In the Support Files folder look for a file with a name something like tw10428.dat

Change the three letters in this file from dat to bak

This file will now be named tw10428.bak or something similar as its possible the numbers could be slightly different as I have not examined every non-English version.

Launch Photoshop. All will now be in English!

If ever wanting to revert Photoshop back to its original language, follow the instructions above and navigate to the tw10428.bak file in which the name was changed. Change the “bak” back to dat

Restart Photoshop and the original language will once again be active.


Photoshop Spot Channel Compatability

Adobe Photoshop Spot Channel Backwards Compatibility Issue

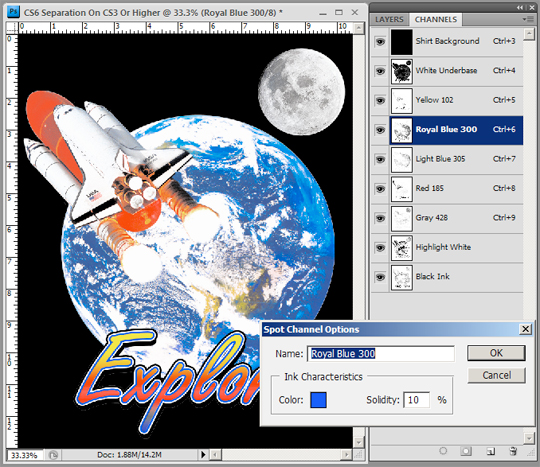
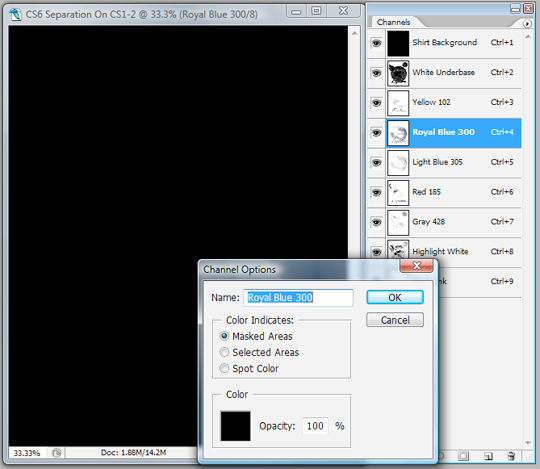
Although this may not be an issue within your shop, if sending spot color separations done using Photoshop CS6 (or later) to another party, be aware they are not compatible and will preview incorrectly with Photoshop versions CS2 or earlier as illustrated below.

This is an issue with Photoshop itself and Adobe has no intention to support spot channel compatibility with any version of Photoshop earlier than CS3.

Here’s a color separation done using Photoshop CC opened in Photoshop CS4. There are no issues whatsoever and all appears normal. Its also normal if using CS3, CS5, CS5.1 and CS 5.5.

photoshop spot channel panel ultraseps

Here’s the same CC color separation opened in Photoshop CS2 and there’s major issues with it. Notice the spot channels have been changed to Alpha Channels and all the correct color information is not recognized. If opening with CS1 or earlier, the image data within the channels themselves is also gone.  The best plan of attack here is to always use Photoshop CS4 or higher.

photoshop cs2 cs3 ultraseps

Countless people continue using very old copies of Adobe Photoshop so keep this in mind when sending a spot channel separation created using a modern version to someone else outside of your shop!

Manually Resetting Photoshop Preferences Windows

How To Reset The Preferences File Of Adobe Photoshop “Manually” On Windows

If Photoshop is generating blank color channels when running index separations or other errors that can’t be explained are popping up, many times its the result of a damaged preferences file. This video illustrates how to physically remove this file from Photoshop. When Photoshop is relaunched, it will then generate a new clean preferences file.

Manually Install UltraSeps Plugin Photoshop All Versions

How To Manually Install The UltraSeps Plugin And English.data File

If installing a new or other version of Photoshop to your system after UltraSeps has been installed and unlocked previously, the UltraSeps Plugin and English.data file will also need to be copied to the new copy of Photoshop in addition to the UltraSeps v2 Actions loaded into the Actions Panel of the new Photoshop. Just installing the Actions and loading the Color Settings does not make UltraSeps functional with the new copy of Photoshop.

The below process can also done by running a newly downloaded installer.  Although if your copy of Photoshop is installed to a location other than Program Files on Windows or the Applications Folder on Macintosh, these files will need to be placed manually as per below instructions.

Instructions:

Close Photoshop.

Locate the Adobe Photoshop folder currently in use and open it.

Now go to the UltraSeps v2 Folder downloaded from our site, the one containing all the files.

Open the Backup Files Folder.

Copy the English.data file to the Photoshop Folder. This is not required on Macintosh.

Now open the Plug-ins Folder inside the Photoshop folder.

On Photoshop versions prior to CC 2017, if a folder named Automate does not already exist inside the Plug-ins folder, create one.

Copy the correct UltraSeps Plugin to the Automate Folder for your copy of Photoshop and system.

On Photoshop versions CC 2017 and later, just copy the correct UltraSeps plugin directly to the Plug-ins folder of Photoshop.  (Using an Automate Folder inside of Plug-ins isn’t required)

Restart Photoshop if running.

Load the UltraSeps v2 Actions into the Actions Panel of Photoshop.

Run the Action to load the UltraSeps Color Settings.

All will now function.